Here’s a question – how do you add structure to your blog articles?
Do you give it a title, write a few paragraphs and break those up with subheadings? If so, you’re onto a good thing – it’s a great formula, and most importantly – it makes your blog easy to read.
But did you know, that the subheadings within your article should be tagged as headings?
Don’t know what I mean? Let me tell you about heading tags…
If you’re used to writing Word documents, you’ll be well versed in making a subheading by using a bit of formatting – for example, you might give the text a different font or colour, or make it bigger and bolder.
But what if I told you there’s a better way? A way that helps Google make better sense of the text on your website and your blog.
You got it: heading tags.
What’s a heading tag?
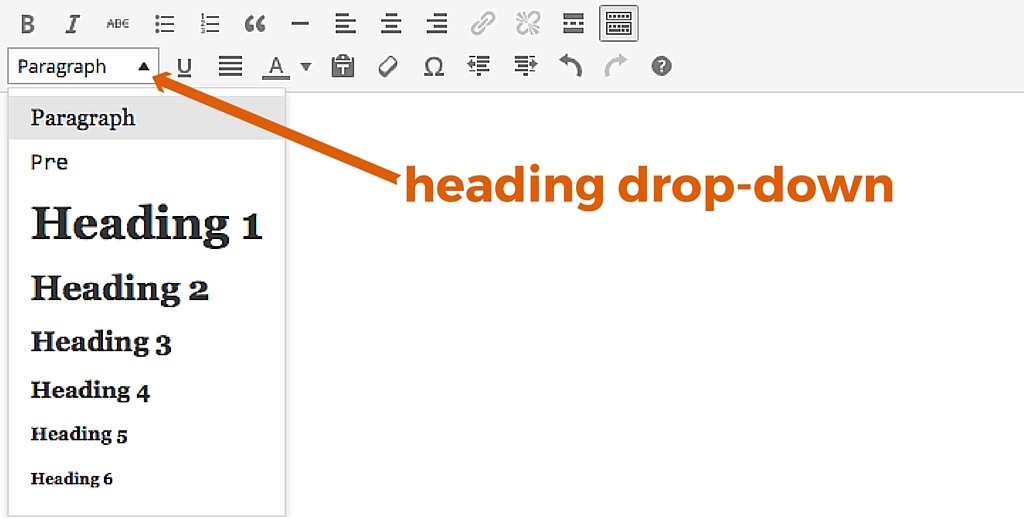
Each website looks a bit different, but have you seen something like this before?

This drop-down menu is where you’ll find your heading tags, and it normally sits just above the text box when you’re logged into your website.
Long story short, the heading options shown are a way of automatically formatting the headings and subheadings on your page or blog article, only they have secret powers: they send out signals to search engines about the information on your page.
As you can see, there are six different types of headings (we’ll abbreviate them H1, H2, H3 and so on). They’re each tagged to add a sort of invisible label to the heading. This invisible label effectively ranks your headings (starting with H1) from ‘most important’ right down to ‘somewhat less important, but still important’.
You might like to think of it like a folder of files on your computer: you’ve got a folder (let’s call it H1) where you keep all your files on a main subject. Within that folder, you might have a sub-folder (that’d be your H2), about a smaller branch of that main subject, and within that, ANOTHER folder of files (an H3) specific to that sub-folder.
Let’s run through an example:
If your article is about New Zealand, here’s how you might use heading tags (with each heading having paragraphs of text beneath it)
- Introducing New Zealand (H1)
- About Tauranga (H2)
- Bethlehem Suburb (H3)
- Matua Suburb (H3)
- Otumoetai Suburb (H3)
- About Hamilton (H2)
- Hillcrest Suburb (H3)
- Flagstaff Suburb (H3)
- Dinsdale Suburb (H3)
- About Tauranga (H2)
As you can see, heading tags create a hierarchy of information. Make sense?
Headings on web pages are the same – they shouldn’t be there just for looks. They carry a lot of weight, and help organise the information so that google can make sense of what you’re talking about.
Why are heading tags so important?
There’s only one answer to this question, and it’s a short one: Google!
It’s understood that Google pays attention to the words in your headings, because they expect your headings to provide clues about what the topic of the page is. (And if Google knows what the page is about, it’s going to do a better job of sending people to that page – assuming they actually need that information!)
How exactly do I use heading tags?
Once you’ve wrapped your head around the idea of heading tags, using them is actually pretty straightforward.
Simply highlight the words, and choose the appropriate heading tag from the drop down menu in the back-end of your website.
Stuck? Ask your web-developer for help (or contact us).
4 Rules for using heading tags:
- Only have one H1 tag per page – this will normally be the name of your page or the title of your blog article.
- Follow the hierarchy – it’s easy to get sidetracked by size or style, but an H1 tag should always be followed by an H2, which should be followed by an H3, and so on. (Basically, avoid jumping from an H1 to an H3.)
- However – you can use more than one of the same tag (except that H1) in your article.
- Be sure to include keywords. Don’t stuff your headings full them, but do make sure some of the words you use are the words that your audience is searching.
Questions about heading tags?
Leave a comment below, otherwise happy heading tagging!

